Virtuoso Universal Server AMI for Amazon EC2 Instantiation Guide
- Introduction
- Prerequisites
- Virtuoso AMI Setup & Instantiation
- Post-Installation Tasks
- Update the OS and Virtuoso components on the AMI
- Adjust Virtuoso configuration files for your specifics
- Start the License Manager and Virtuoso processes
- First-run task: Change default passwords
- Update and start example
- Instance Enhancements
- Installing additional VAD application packages
- Using OAT Applications from your Virtuoso EC2 AMI instance
- Related Items
Introduction
The Virtuoso Universal Server AMI for Amazon EC2 comprises a cloud-based bundle of the following OpenLink and third-party products and services:
- Virtuoso Universal Server
- Virtuoso Sponger Middleware & Cartridges (extensible RDFizer covering 30+ different data formats)
- OpenLink Data Spaces (ODS)
- OpenLink Ajax Toolkit (OAT)
- 3rd party PHP applications (WordPress, MediaWiki, phpBB, and Drupal)
This offering complements our EBS-backed BYOL ("Bring Your Own License") Virtuoso EC2 AMI.
Prerequisites
- Register for an Amazon Web Services (AWS) account.
- New AWS accounts have been automatically signed up for the Amazon S3 and EC2 Web Service for several years. If you created your AWS account a long time ago, you may now need to manually sign up for these services.
Virtuoso AMI Setup & Instantiation
Follow the steps below to set up and launch your Virtuoso EC2 AMI instance.
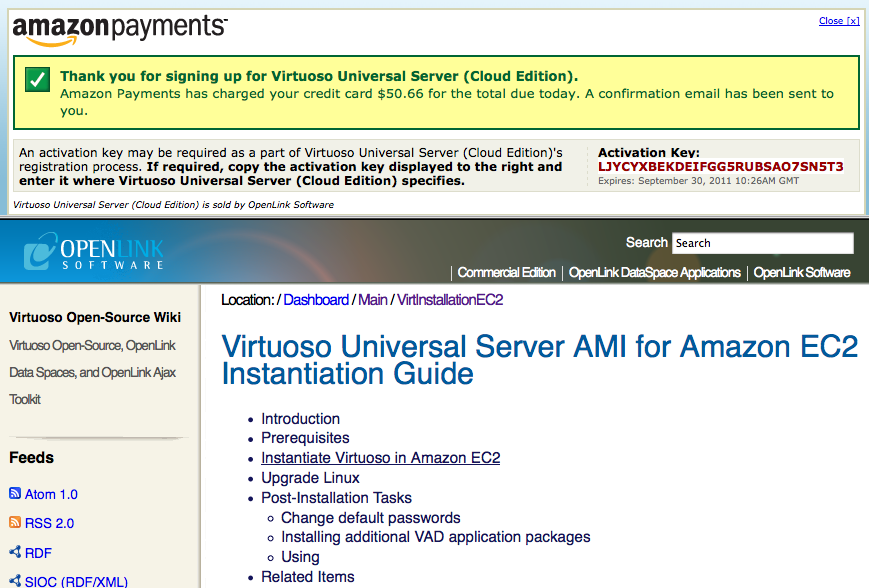
- Subscribe to the Virtuoso Universal Server (Cloud Edition) Amazon DevPay service to activate the Virtuoso AMI on your account.
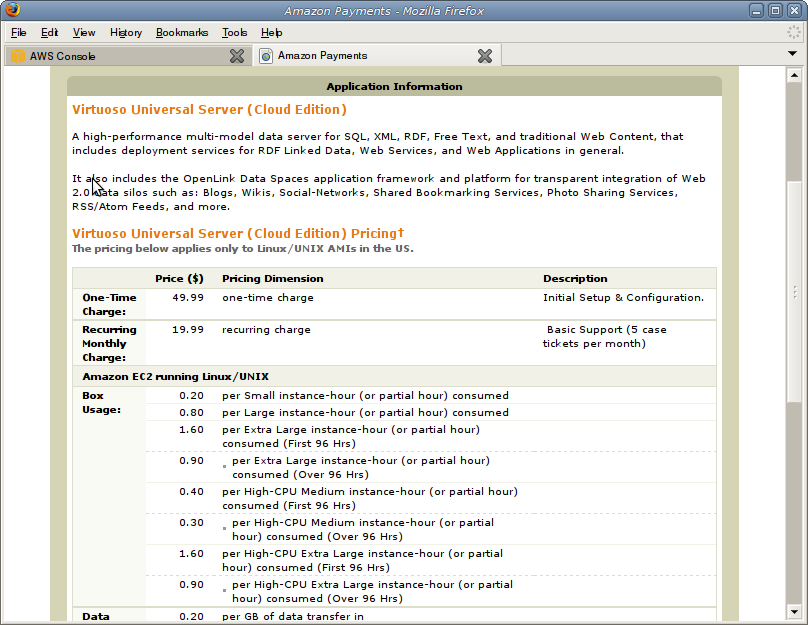
- After successful subscription the
DevPay service redirects users back to this page to continue the AMI instantiation as detailed in step 4.
-
Important:
Note that the activation key is only valid for 60 minutes, and is included as part of the redirect URL for AWS to use when instantiating the AMI.
If you browser session is shut down for any reason, or if more than 60 minutes elapse before you take the next step, you will need to generate a new activation key, as follows --
- A new activation key can be generated through the
Application Activationtab of the Virtuoso Universal Server (Cloud Edition) AMI Application page.
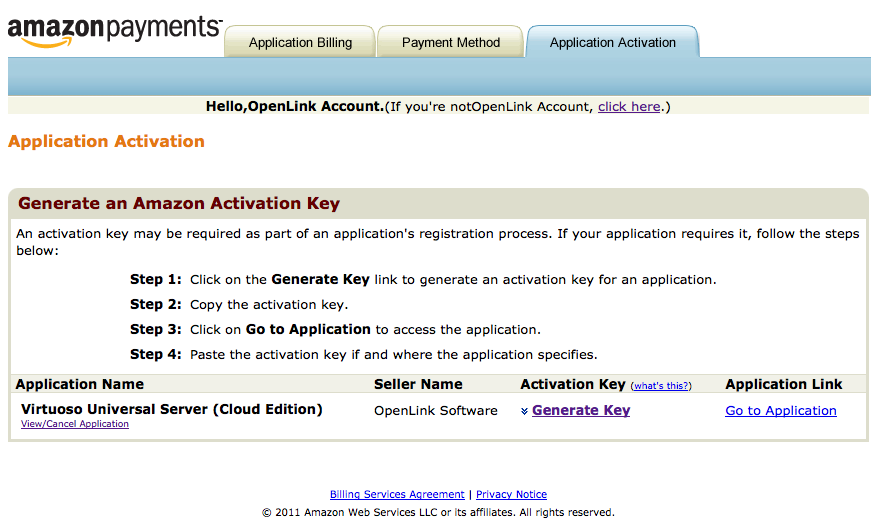
- Select Generate Key, followed by Go to Application, to get a new key.
You will once again be redirected to this page (with the product code and new activation key passed in the URL), and can then continue the instantiation as detailed in step 4.
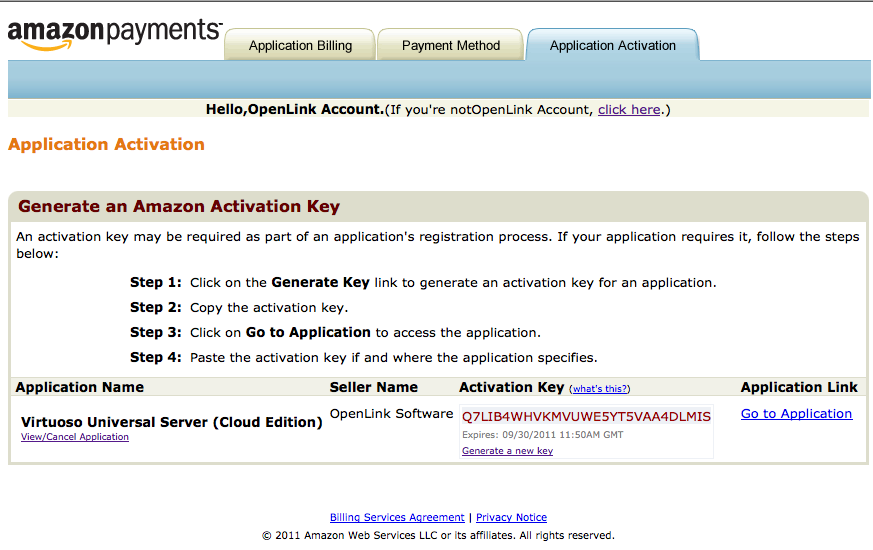
- A new activation key can be generated through the
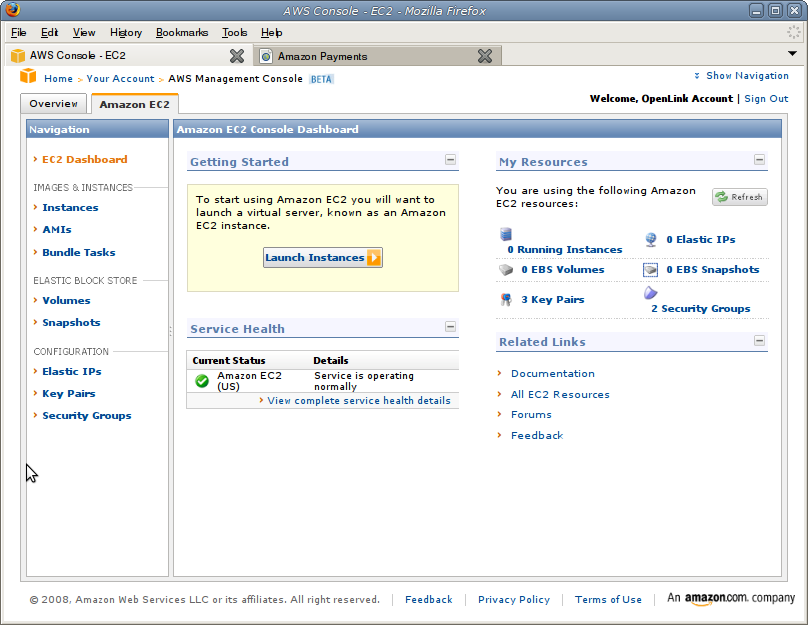
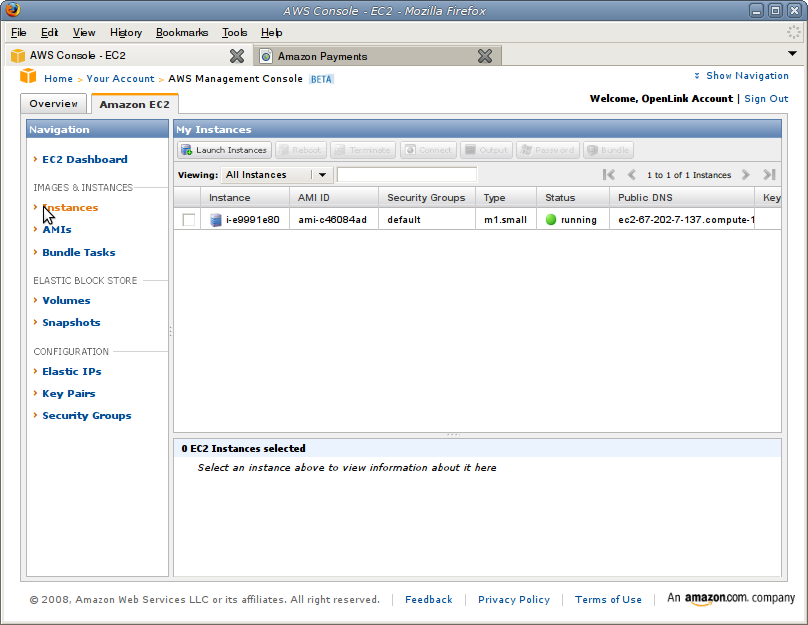
- Open the AWS Management Console.
From here, you can see a dashboard showing any current instances you may have running and a menu of various areas to control (instances, AMIs, etc.).
- You will need to create a new security group (firewall configuration) for the Virtuoso AMI.
- Click on Security Groups at the bottom of the left menu. By default, there is one group called default visible.
- Create a new security group (here called openlink) and, add the port
22/tcp(SSH) to enable ssh access to the AMI, also allow connections to port80/tcp(HTTP) and port8890/tcp(used by Virtuoso). Please refer to the Amazon EC2 Authorizing Network Access to Your Instances document for further details.
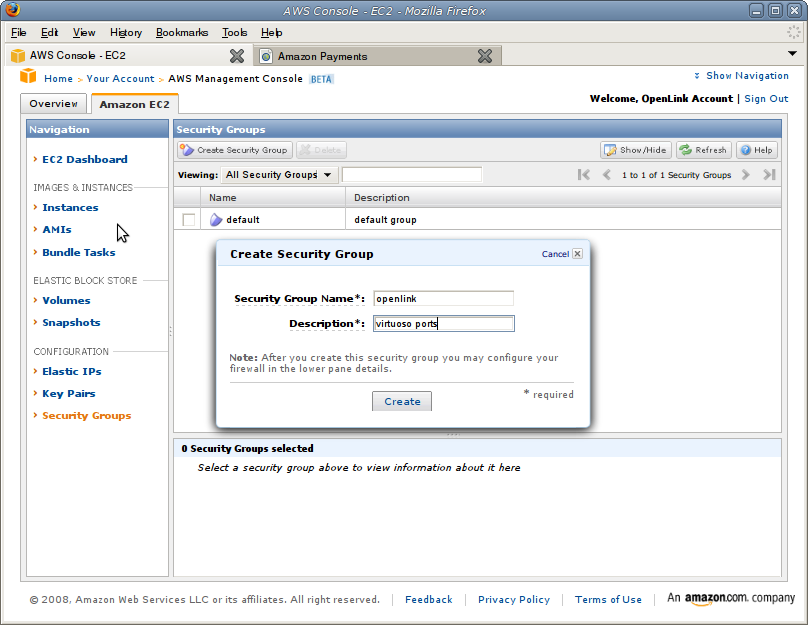
- Save it and return to the dashboard.
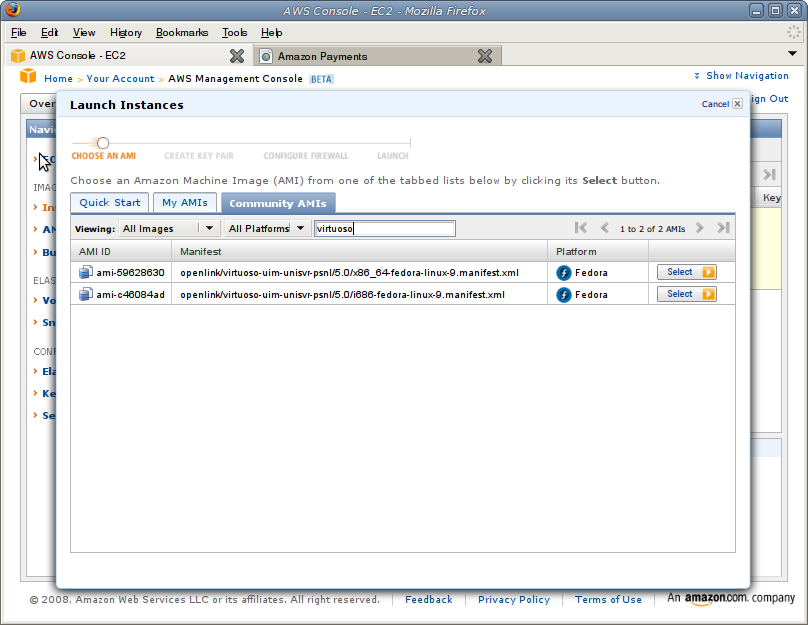
- Now we need to create an instance of the image.
- From the Console, select Launch Instances.
- You need to choose an AMI.
In the Community AMIs tab, type virtuoso to see the relevant images published by OpenLink —
- Virtuoso Release 7 AMIs
Edition ID Manifest file 64-bit ami-2c9de345openlink/virtuoso-uim-unisvr-psnl/7.0/x86_64-centos-5.9.manifest.xml
- Virtuoso Release 6 AMIs
Edition ID Manifest file 64-bit ami-23d0334aopenlink/virtuoso-uim-unisvr-psnl/6.0/x86_64-centos-5.3.manifest.xml32-bit ami-2fd03346openlink/virtuoso-uim-unisvr-psnl/6.0/i386-centos-5.3.manifest.xml
- Virtuoso Release 5 AMIs
Edition ID Manifest file 64-bit ami-59628630openlink/virtuoso-uim-unisvr-psnl/5.0/x86_64-fedora-linux-9.manifest.xml32-bit ami-c46084adopenlink/virtuoso-uim-unisvr-psnl/5.0/i686-fedora-linux-9.manifest.xml
- Virtuoso Release 7 AMIs
- Choose whichever image you prefer, 64-bit (x86_64) or 32-bit (i686) and press Select.
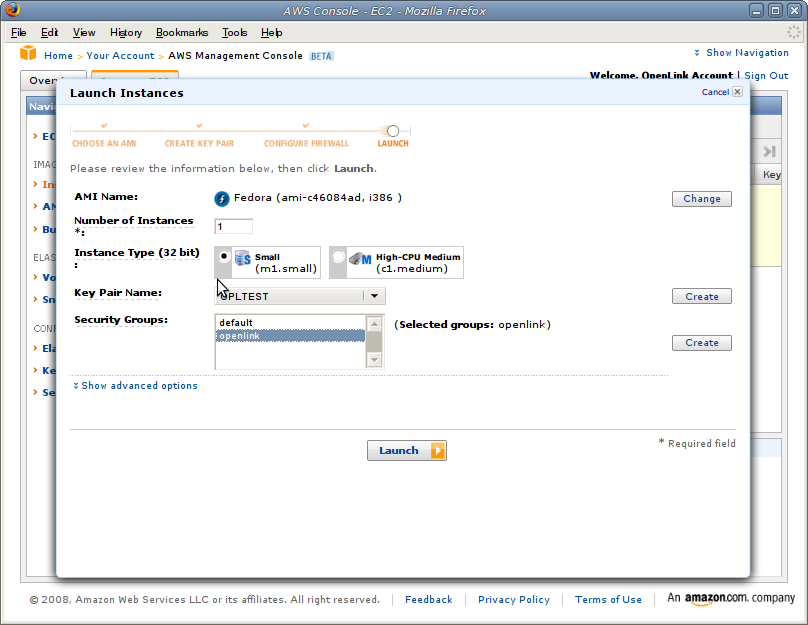
- Enter the Number of Instances (normally 1).
- Select the Instance Type.
-
Note: The Virtuoso Release 7 AMI is available in 64bit form only, thus an
m1.largeinstance type or larger must be chosen. - Note: The optimal Instance Type will depend on the use for this instance, including the data to be hosted. If you intent to host your own DBpedia, Neurocommons, Bio2RDF instance, see the instructions relevant to the data set before proceeding!
-
Note: The Virtuoso Release 7 AMI is available in 64bit form only, thus an
- Choose a key-pair or create a new one for the purpose. This will be used as an SSH key to access your instance later.
- Select the openlink security group created earlier.
- Click the Launch button.
- You will see a status page saying your instances are in the process of launching, and the next time you visit the dashboard there will be an appropriate instance listed for you to simply Stop, Start, etc.
Post-Installation Tasks
Update the OS and Virtuoso components on the AMI
OpenLink Virtuoso Cloud Edition is based on Fedora and CentOS? Core Linux images which you should update before first using your Virtuoso instance, and regularly thereafter. This can be done as follows:
- Locate the key created above and run the command —
chmod 600 MyKeyPair.pem
- Connect to the EC2 AMI Server with the command —
ssh -i MyKeyPair.pem root@your-ec2-instance-cname
- The Virtuoso EC2 AMI installation is located in
/opt/virtuoso. From this location first run the following commands to shutdown the Virtuoso server instance —
. ./virtuoso-environment.sh
virtuoso-stop.sh
oplmgr +stop
-
Important:
Update the Virtuoso EC2 AMI installation to the latest OS and Virtuoso versions.
Exact sequence depends on which Virtuoso Release you are running --
- Users of AMIs with Virtuoso Release 5 must run the following command sequence to first update the OpenLink License Manager (
oplmgr) and license file (virtuoso.lic), and then update the OS and Virtuoso. DO NOT use this sequence with any other Virtuoso Release! —
yum update oplmgr virtuoso-ami-init
yum update
- Users of AMIs with Virtuoso Release 6 must run the following command sequence to first remove the pre-existing Virtuoso database file (
virtuoso.db) and transaction log file (virtuoso.trx) , and then update the OS and Virtuoso. DO NOT use this sequence with any other Virtuoso Release! —
cd database
rm virtuoso.db
rm virtuoso.trx
yum update
- Users of AMIs with Virtuoso Release 7 or later should simply update the Virtuoso EC2 AMI installation to the latest OS and Virtuoso versions with the following command.
DO NOT use this sequence with any earlier Virtuoso Release! —
yum update
While you can, and should, keep the whole operating system up to date with this method, you can also upgrade only the Virtuoso components with the command —
yum update --disablerepo=* --enablerepo=virtuoso
- Users of AMIs with Virtuoso Release 5 must run the following command sequence to first update the OpenLink License Manager (
Adjust Virtuoso configuration files for your specifics
- Edit the Virtuoso configuration file
/opt/virtuoso/database/virtuoso.iniand set theDefaultHost?parameter in theURIQAsection toyour-ec2-instance-cname(or whatever external cname the instance will be configured to use). This is required for the correct hostname to be picked up when using the ODS and other applications —
[URIQA]
DynamicLocal = 1
DefaultHost  = your-ec2-instance-cname:80
- Edit the Virtuoso configuration file
/opt/virtuoso/database/virtuoso.iniand add the lineLoad8 = plain, qrcodeto the[Plugins]section to enable qrcode support in the Virtuoso Server —
[URIQA]
[Plugins]
LoadPath = ../hosting
Load1    = plain, wikiv
Load2    = plain, mediawiki
Load3    = plain, creolewiki
Load4    = plain, im
Load5    = plain, wbxml2
Load6    = attach, libphp5.so
Load7    = Hosting, hosting_php.so
Load8    = plain, qrcode
Start the License Manager and Virtuoso processes
- The OpenLink License Manager can now be restarted with the command —
/usr/sbin/oplmgr +start
- The Virtuoso server can then be restarted with the command —
virtuoso-start.sh
First-run task: Change default passwords
Virtuoso has two system users, dba (for SQL/relational/system-admin tasks) and dav (for WebDAV and ODS), with default passwords matching their usernames.
On any live server, it is essential to change these two passwords to something more secure, of your own choosing.
To this end,
- Open the location http://your-ec2-instance/conductor/ in a web browser.
- Log in as dba/dba

- Select System Admin from the menu and then User Accounts from the second level menu.

- Click Edit beside the dba user.
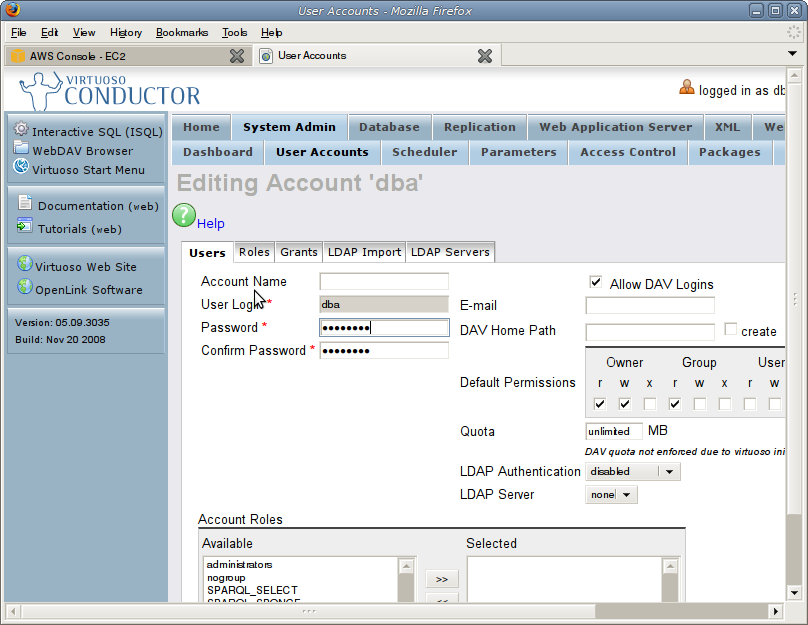
- Enter replacement passwords in both boxes and press the Save button at the bottom to return to the user-list.
Update and start example
A complete update and initial startup run will look something like this —
$ chmod 600 MyKeyPair.pem
$ ssh -i MyKeyPair.pem root@ec2-67-202-24-222.compute-1.amazonaws.com
The authenticity of host 'ec2-67-202-24-222.compute-1.amazonaws.com (67.202.24.222)' can't be established.
RSA key fingerprint is 58:ae:0b:e7:a6:d8:d0:00:4f:ca:22:53:42:d5:e5:22.
Are you sure you want to continue connecting (yes/no)? yes
Warning: Permanently added 'ec2-67-202-24-222.compute-1.amazonaws.com,67.202.24.222' (RSA) to the list of known hosts.
-bash-3.1# cd /opt/virtuoso/
-bash-3.1# ls
bin       hosting  lib  virtuoso-environment.csh  vsp
database  install  vad  virtuoso-environment.sh
-bash-3.1# . ./virtuoso-environment.sh
-bash-3.1# virtuoso-stop.sh
Shutting down Virtuoso instance in [database]
-bash-3.1# yum update
Loading "installonlyn" plugin
Setting up Update Process
Setting up repositories
core                      100% |=========================| 1.1 kB    00:00
extras                    100% |=========================| 1.1 kB    00:00
updates                   100% |=========================| 1.2 kB    00:00
virtuoso                  100% |=========================|  951 B    00:00
Reading repository metadata in from local files
primary.xml.gz            100% |=========================| 1.8 MB    00:01
extras    : ################################################## 5699/5699
.
.
.
-bash-3.1# vi database/virtuoso.ini
-bash-3.1# /usr/sbin/oplmgr +start
-bash-3.1# virtuoso-start.sh
Starting Virtuoso instance in [database]
-bash-3.1#
Instance Enhancements
Installing additional VAD application packages
Additional VAD application packages are available for the Virtuoso demo database, documentation and tutorials which can be installed from a yum install as follows:
[root@domU-12-31-39-00-00-61 virtuoso]# yum install virtuoso-vad-doc virtuoso-vad-demo virtuoso-vad-tutorial
Loaded plugins: fastestmirror
Loading mirror speeds from cached hostfile
 * extras: mirror.trouble-free.net
 * updates: mirrors.cmich.edu
 * base: centos.mbni.med.umich.edu
 * addons: mirror.skiplink.com
Setting up Install Process
Parsing package install arguments
Resolving Dependencies
--> Running transaction check
---> Package virtuoso-vad-doc.x86_64 0:6.0.3123-1.20091016 set to be updated
---> Package virtuoso-vad-demo.x86_64 0:6.0.3123-1.20091016 set to be updated
---> Package virtuoso-vad-tutorial.x86_64 0:6.0.3123-1.20091016 set to be updated
--> Finished Dependency Resolution

Dependencies Resolved

================================================================================
 Package                  Arch      Version                   Repository   Size
================================================================================
Installing:
 virtuoso-vad-doc         x86_64    6.0.3123-1.20091016       virtuoso     64 M
 virtuoso-vad-demo     x86_64     6.0.3123-1.20091016        virtuoso     9.1 M
 virtuoso-vad-tutorial    x86_64    6.0.3123-1.20091016       virtuoso    5.2 M

Transaction Summary
================================================================================
Install      3 Package(s)
Update       0 Package(s)
Remove       0 Package(s)

Total download size: 69 M
Is this ok [y/N]: y
Downloading Packages:
(1/3): virtuoso-vad-tutorial-6.0.3123-1.20091016.x86_64.    | 5.2 MB     00:01
(2/3): virtuoso-vad-demo-6.0.3123-1.20091016.x86_64.rpm     | 9.1 MB     00:00
(3/3): virtuoso-vad-doc-6.0.3123-1.20091016.x86_64.rpm      |  64 MB     00:04
--------------------------------------------------------------------------------
Total                                               12 MB/s |  69 MB     00:05
Running rpm_check_debug
Running Transaction Test
Finished Transaction Test
Transaction Test Succeeded
Running Transaction
  Installing     : virtuoso-vad-doc                                  [1/3]
  Installing     : virtuoso-vad-demo                                 [2/3]
  Installing     : virtuoso-vad-tutorial                             [3/3]

Installed: virtuoso-vad-doc.x86_64 0:6.0.3123-1.20091016 virtuoso-vad-demo.x86_64 0:6.0.3123-1.20091016 virtuoso-vad-tutorial.x86_64 0:6.0.3123-1.20091016
Complete!
[root@domU-12-31-39-00-00-61 virtuoso]#
These VAD packages can then be installed by the Virtuoso Conductor UI from the System Admin->Packages tab where they will now be listed as available to install.
Using OAT Applications from your Virtuoso EC2 AMI instance
Install the OAT (OpenLink Ajax Toolkit) VAD package via the Admin UI, and then you can use the URL patterns below within your browser:
| Entire OAT Demo Collection | http://your-ec2-instance-cname/oatdemo |
| OpenLink Data Explorer | http://your-ec2-instance-cname/ode |
| Interactive SPARQL Query Builder (iSPARQL) | http://your-ec2-instance-cname/isparql |
| SQL Query Builder (iSQL) | http://your-ec2-instance-cname/qbe |
| Forms Builder (for building Meshups based on RDF, SQL, or Web Services Data Sources) | http://your-ec2-instance-cname/formdesigner |
| SQL DB Schema Designer (a Visual SQL-RDF Mapper is also on its way!) | http://your-ec2-instance-cname/dbdesigner |
| To view the OAT Tree (there are some experimental demos that are not listed in the main demo app) | http://your-ec2-instance-cname/DAV/JS/ |
Note: Should license expiration errors be encountered, which may occur due to changes in AMI components, please make a ssh connection to the Linux virtual machine and perform the following steps to obtain an updated license:
ssh -i MyKeyPair.pem root@your-ec2-instance-cname
. ./virtuoso-environment.sh
virtuoso-stop.sh
yum update virtuoso-ami-init
virtuoso-start.sh
Related Items
- OpenLink Data Spaces Installation
- EC2 & AMI related information
- EBS-backed BYOL ("Bring Your Own License") Virtuoso EC2 AMI
- Pre-configured & Pre-loaded Virtuoso instances (DBpedia, BBC Music & Programmes etc.)
- Creating Your Own Neurocommons Instance
- Creating Your Own Bio2RDF Instance
- Creating Your Own MusicBrainz Instance
- Backup Your Virtuoso EC2 AMI to S3
- Configure your Virtuoso EC2 AMI for use with Amazon Elastic Block Storage (EBS)
- Amazon-provided AWS Simple Monthly Cost Calculator
- Protecting your Virtuoso-hosted SPARQL Endpoint
- Virtuoso documentation
- Virtuoso Tips and Tricks
CategoryHowTo CategoryODS CategoryVirtuoso CategoryDocumentation CategoryEC2